
Introduction to 7-Piece Clip-In Hair Extensions
Hair extensions offer a simple way to change your look. They can add length, volume, or even splashes of color without the long-term commitment of traditional hair treatments. How to put in 7 piece clip in hair extensions? Clip-in hair extensions are especially popular because they are easy to put in and take out, and they don’t cause damage to your natural hair. In this introduction, you’ll learn about the convenience and versatility of the 7-piece clip-in hair extensions set.
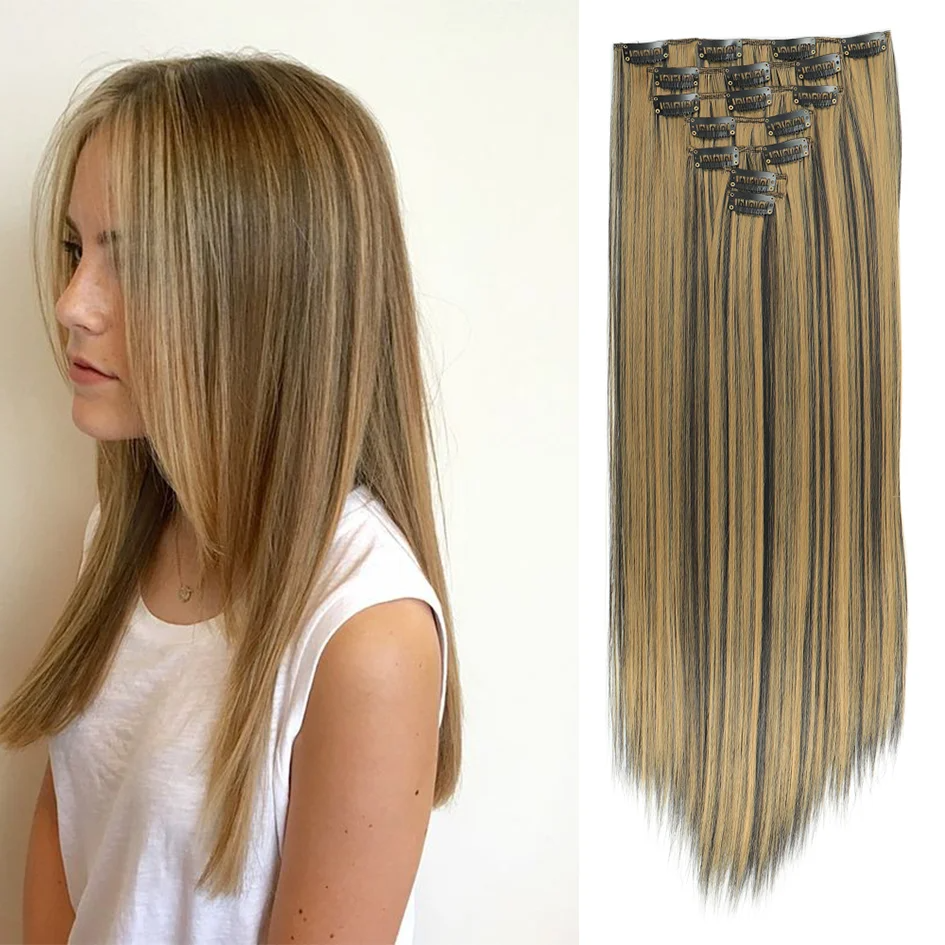
Seven-piece clip-in hair extensions provide a full-head solution. This set typically includes wefts with different widths. You get more coverage and can tailor the placement to your hair’s needs. For beginners wondering how to put in 7 piece clip in hair extensions, don’t worry. It’s straightforward, and with a little practice, you may master it quickly.
Whether you aim for a fuller hairstyle, longer locks, or a new style without a salon visit, these extensions are the perfect choice. So, if you’re ready to transform your hair in minutes, let’s proceed to prepare your natural hair for the extensions.
Preparing Your Natural Hair for Extensions
Sectioning and Teasing Your Hair
Before you begin to apply the 7-piece clip-in hair extensions, it’s important to properly prepare your natural hair. Here’s how to get your hair ready for a flawless extension fit:
- Start with clean, dry hair. Make sure your hair is free from oils and conditioners that can prevent clips from holding securely.
- Detangle your hair thoroughly using a wide-tooth comb to avoid any knots or snags during the application process.
- Create a straight horizontal part across your scalp at the nape of your neck. This will be the base for your first weft. Use mirror to help you see the back of your head if needed.
- Optionally, lightly tease the hair at the roots where the clips will attach. This provides extra grip for the clips, ensuring they stay in place.
- Clip up the hair above the part to keep it out of the way. Use a clip or hair tie to secure the upper sections of your hair.
By following these simple steps, you’ll ensure that your hair is in the best condition to receive the clip-in hair extensions securely and with ease. Remember to section neatly and tease gently to maintain your natural hair’s health.
Step 1: Starting at the Nape of the Neck
Gently Brushing and Attaching the 3 Clip Weft
The first step in learning how to put in 7 piece clip in hair extensions begins at the nape of the neck. Here, you will attach the 3 clip weft, which is the foundation of your extension application process.
- Ensure your hair is tangle-free before starting. Use a brush or comb to smooth out any knots.
- Select the 3 clip weft from your set. Hold it up against the base of the parted section to ensure it fits.
- Open each clip on the weft. Position the center clip just below the part line, close to the roots.
- Press down firmly until the clip snaps shut. This secures the weft in place.
- Repeat for the outer clips, making sure the weft lies flat and comfortable against your scalp.
- Double-check the weft to ensure it’s securely attached and blends with your natural hair.
After completing this step, your first set of clips is in place, laying the groundwork for the rest of the extensions. It’s crucial to make sure this base layer is done correctly as it affects how the rest of the extensions will sit. Remember, practice makes perfect. The more you apply, the better you’ll become at achieving a natural and comfortable fit.
Step 2: Applying the Middle Wefts
Sectioning and Clipping the 4 Clip Weft
Once you’ve secured the 3 clip weft at the nape, it’s time to move upwards. Here’s how to put in the middle wefts of your 7-piece clip-in hair extensions:
- Select the 4 clip weft from your extension set. Ensure its length matches the section you’re about to clip.
- Create another straight horizontal part about an inch above the first weft. Do this with care to maintain a neat base.
- Hold the 4 clip weft up to the newly parted section. Check that it fits from end to end.
- Start clipping in the middle first. Attach the central clips securely to your natural hair near the roots.
- Snap shut the outer clips. Make sure the weft sits smoothly against your head without any bumps.
- Let down a bit of hair to cover the top edge of the weft. This helps blend the extensions with your hair.
Repeat the steps for additional middle wefts, moving upwards and keeping sections even. By following this method, you ensure a secure hold and seamless blend for a fuller, more natural look. Proper placement is key to achieving an undetectable integration of your hair extensions.
Step 3: Adding Volume on the Sides
Placing the 2 Clip Wefts Near the Hairline
Once you have the middle wefts in place, the next step is to add volume on the sides. This helps to create a balanced look and enhances the natural flow of your hair. Here’s how to put in the side wefts:
- Locate the 2 clip wefts included in your 7-piece clip-in hair extensions set.
- Make a part about an inch above your ear. Keep the line straight for a neat look.
- Hold the weft up to the part to check the fit. Adjust if necessary.
- Start with the clip closest to the front. Attach it near the part line, just above your ear.
- Press the clip down firmly until it snaps into place.
- Repeat with the second clip, making sure the weft lies flat against your head.
- Let down some hair to cover the weft, blending it with your natural hair.
By placing the 2 clip wefts correctly, you add volume where it’s often needed most, especially if you have thin or fine hair. This ensures that your extensions look as natural as possible, giving the illusion of fuller, thicker hair. With this step, you’re well on your way to achieving a complete transformation with your how to put in 7 piece clip in hair extensions. Just remember to place the clips securely to avoid shifting during wear.
Step 4: Blending and Styling
Brushing and Ensuring No Clips are Visible
Successfully attaching your 7-piece clip-in hair extensions is only part of the process. Now, let’s blend them seamlessly with your natural hair for a polished look.
- Gently brush your hair and the extensions together. Use a soft-bristle brush or wide-tooth comb to minimize tugging.
- Start from the bottom and work your way up to avoid pulling at the clips.
- Check in a mirror to make sure no clips are peeking through. Adjust any strands of hair to cover them if needed.
- Style your hair as desired, whether straight, curled, or in an updo.
Remember, styling your natural hair and the extensions together creates a unified look. Blending is key for the extensions to appear as your own hair.
Additional Styling Tips
Using Clip-In Bangs for a New Look
If you’re aiming for a quick style change, consider using clip-in bangs. Here’s how to incorporate them:
- Choose clip-in bangs that match your hair color and texture.
- Clip them in at your hairline, ensuring they sit flat and comfortable.
- Blend by brushing them together with your own hair.
- You can trim them for a custom fit, but use caution or seek a professional.
Clip-in bangs are an easy way to experiment with your style without commitment. They can refresh your look instantly.
Maintenance and Care for Your Clip-In Extensions
Brushing and Storage Tips
To keep your extensions in top shape, follow these maintenance tips:
- Brush them before and after use to prevent tangles.
- Store them flat or hang them up to maintain their shape.
- Keep them clean, but avoid overwashing to preserve their quality.
- Follow specific care instructions provided with your clip-in hair extensions.
Proper care extends the life of your extensions and keeps them looking fresh.
Wrapping Up with Helpful Resources
Utilizing Social Media Tutorials and Community Support
Learning how to put in 7 piece clip in hair extensions gets easier with practice. Don’t shy away from using video tutorials and social media platforms for extra guidance. Online communities can offer support and tips from fellow users. Harness these resources to boost your confidence and skill in applying and styling your clip-in extensions.
Additional Styling Tips
Using Clip-In Bangs for a New Look
When you want to switch up your style, clip-in bangs are a great option. Here’s how to add them to your look:
- Pick bangs that are a close match in color and texture to your hair.
- Attach the bangs to your hairline, check for a snug fit.
- Brush them in with your hair for a seamless blend.
- Trim if needed, but be cautious or seek help from a pro.
Clip-in bangs can quickly refresh your look without the long-term commitment. They’re a simple way to experiment with your style and add flair to your everyday look.
By incorporating these styling tips, you’ll enhance the versatility of your how to put in 7 piece clip in hair extensions. The focus should always be on achieving a natural appearance that complements your individual style. Remember, the goal is to make your hair extensions look indistinguishable from your natural hair for that flawless finish.
Maintenance and Care for Your Clip-In Extensions
Proper care is vital to keep your clip-in hair extensions looking as good as new. Here’s a simplified guide to help you maintain their quality and longevity:
Brushing and Storage Tips
- Brush Gently Before and After Use:Regular brushing keeps tangles at bay. Use a soft-bristle brush or wide-tooth comb to avoid damage.
- Store Properly:Lay them flat or hang them when not in use. This helps maintain their natural shape.
- Clean Sparingly:Wash your extensions only when needed. Overwashing can reduce their lifespan.
- Follow the Care Guide:Each set comes with instructions. Stick to these for best results.
Taking the time to care for your extensions will ensure they look great every time you wear them. Remember, treat them as gently as you would your own hair, and they’ll remain a go-to accessory for your style needs.
Wrapping Up with Helpful Resources
To master how to put in 7 piece clip in hair extensions, use every tool available. Online tutorials can be a goldmine for tips. They show you the how-tos in action, making it easier to follow. Instagram and YouTube are rich with hairstyling content. Just search the right hashtags or keywords, like #hairtutorial or #clipinextensions. Look for influencers or brands known for their hair expertise. They often have step-by-step guides and styling inspiration.
Don’t forget to join online communities or forums. Many beauty forums have threads dedicated to hair extensions. In these spaces, you can ask questions and share experiences. Other users may offer advice or reveal their own tricks. If you encounter any issues, chances are someone else has too.
Lastly, customer support from the hair extension brand can be crucial. Brands like INH offer resources and personalized help. Use these supports to get the most out of your clip-in extensions.
Remember, applying extensions is a skill that improves over time. Practice is key, and these resources can make the journey smoother. Keep exploring, practicing, and experimenting with styles. Soon, your clip-in hair extensions will look as natural as your real hair.